Categories
Photography

Etsy Store

I recently opened an Etsy store.

https://adrianhenslerphotos.etsy.com

Categories
AI ChatGPT Code Photography

Adding EXIF data to an image with Windows command line

There was a post in a Facebook group ( https://www.facebook.com/groups/acdsee) asking how to add EXIF data to an image. The query was how to do this within ACDSee – this may be possible but I did not find the ability on a quick search.

Seemed easy enough to do via command line. I started a ChatGPT session to work on the problem; from prior tasks it seemed like imagemagick might be useful.

Installing imagemagick ( https://imagemagick.org/script/download.php#windows ) and running magick to see the output was helpful in confirming:

magick identify -verbose IMGRP_2024_03_27_9999_20_to_share_BW_blur_better.jpg
Image:
  Filename: IMGRP_2024_03_27_9999_20_to_share_BW_blur_better.jpg
  Permissions: rw-rw-rw-
  Format: JPEG (Joint Photographic Experts Group JFIF format)
  Mime type: image/jpeg
  Class: DirectClass
  Geometry: 4733x3787+0+0
(...snipping for brevity...)
  Properties:
    aux:Lens: RF100mm F2.8 L MACRO IS USM
    aux:SerialNumber: 432029000416
    date:create: 2024-04-26T01:23:20+00:00
    date:modify: 2024-04-26T01:23:20+00:00
    date:timestamp: 2024-04-26T01:42:15+00:00
    exif:ApertureValue: 327680/65536
    exif:Artist: Adrian Hensler
    exif:BodySerialNumber: 123456789
    exif:CameraOwnerName:
    exif:ColorSpace: 1
    exif:ComponentsConfiguration: .
    exif:Copyright:
    exif:CustomRendered: 0
    exif:DateTime: 2024:04:25 22:23:20
    exif:DateTimeDigitized: 2024:03:27 12:43:43
    exif:DateTimeOriginal: 2024:03:27 12:43:43
    exif:ExifOffset: 261
    exif:ExifVersion: 0231
    exif:ExposureBiasValue: 0/1
    exif:ExposureMode: 0
    exif:ExposureProgram: 3
    exif:ExposureTime: 1/200
    exif:Flash: 0
    exif:FlashPixVersion: 0100
    exif:FNumber: 56/10
    exif:FocalLength: 100/1
    exif:FocalPlaneResolutionUnit: 2
    exif:FocalPlaneXResolution: 6240000/1415
    exif:FocalPlaneYResolution: 4160000/943
    exif:GPSInfo: 6867
    exif:GPSVersionID: ....
    exif:LensModel: RF100mm F2.8 L MACRO IS USM
    exif:LensSerialNumber: 0710002371
    exif:LensSpecification: 100/1, 100/1, 100/1, 100/1
    exif:Make: Canon
    exif:MakerNote: 1
    exif:MeteringMode: 3
    exif:Model: Canon EOS RP
    exif:PhotographicSensitivity: 100
    exif:PixelXDimension: 4733
    exif:PixelYDimension: 3787
    exif:RecommendedExposureIndex: 100
    exif:SceneCaptureType: 0
    exif:SensitivityType: 2
    exif:ShutterSpeedValue: 499712/65536
    exif:Software: ACDSee Ultimate 2024
    exif:SubSecTime: 593
    exif:SubSecTimeDigitized: 80
    exif:SubSecTimeOriginal: 80
    exif:UserComment:
    exif:WhiteBalance: 0
    exif:YCbCrPositioning: 1

One issue I did not expect was finding that EXIF does not seem be be standardized between cameras; for my camera ISO is named “exif:PhotographicSensitivity”, but for other cameras it may be “exif:ISOSpeed” or “exif:ISOSpeedRatings”. This seems insane to me; I have not reviewed fully.

In any case, the correct value can be determined by reviewing output from your camata, so I continued.

Rather than sharing the full ChatGPT session as it is a bit jumbled, here is a summary of the ChatGPT session as compiled by ChatGPT. Ive edited for clarity (and to remove excess uses of the word ‘delve’).

Automating EXIF Data Annotation on Images with a Batch Script

Introduction

Photographers and digital artists often need to handle various metadata associated with their images, such as EXIF data, which contains valuable information about the shot, including camera settings. This blog post explores a practical scenario where we automate the annotation of such data directly onto images using a batch script. We’ll dig into the problem, describe the iterative approach taken during a ChatGPT session to refine a solution, and suggest future enhancements.

The Challenge

The task was to automate the embedding of EXIF data (such as camera model, exposure settings, ISO, etc.) onto images, positioning this data visually on the image itself.

Approach and Iteration with ChatGPT

The solution involved using command-line tools to automate the task, enhancing efficiency and scalability. The discussion began with an exploration of using ImageMagick, a powerful image manipulation tool. iteratively refined a Windows batch script to not only fetch EXIF data from images but also dynamically adjust text size based on image dimensions and directly annotate this data onto the images.

During the session, there were a few hurdles, such as handling different EXIF tags that varied by camera manufacturer and ensuring the text was legible on various image sizes. Each problem was tackled one at a time, often testing and revising the script to accommodate new findings or to optimize previous parts of the script.

Final Script Explanation

Just to be clear, this comes with no guarantee; run at your own risk. I tested it briefly on one image only.

The finalized batch script works as follows:

@echo off
setlocal enabledelayedexpansion

:: Check if a filename has been provided as an argument to the script
if "%~1"=="" (
    echo Usage: %0 filename.jpg  :: Display usage if no argument is provided
    exit /b  :: Exit the script if no filename is provided
)

:: Set variables for source and output filenames
set "source=%~1"  :: Source image path (input)
set "output=%~dpn1_EXIF_ADDED%~x1"  :: Output image path with '_EXIF_ADDED' appended to the filename

:: Extract EXIF data and calculate font size based on image width
for /f "tokens=*" %%i in ('magick identify -format "width=%%[fx:w]\nheight=%%[fx:h]\nmodel=%%[exif:Model]\ndatetime=%%[exif:DateTimeOriginal]\nexposure=%%[exif:ExposureTime]\niso=%%[exif:PhotographicSensitivity]\nlens=%%[exif:LensModel]\npointsize=%%[fx:w/30]" "%source%"') do (
    set "line=%%i"  :: Read output line by line into variable 'line'
    set "!line!"  :: Set environment variables dynamically based on the output of the 'magick identify' command
)

:: Set default values for any missing EXIF data to prevent errors
if not defined model set "model=Unknown"
if not defined datetime set "datetime=Unknown"
if not defined exposure set "exposure=Unknown"
if not defined iso set "iso=Unknown"
if not defined lens set "lens=Unknown"
if not defined pointsize set "pointsize=40"  :: Set a default point size if not calculated

:: Annotate the image with the extracted and calculated EXIF data
magick "%source%" -gravity southeast -pointsize !pointsize! -fill white -annotate +10+10 "Model: !model!\nDate: !datetime!\nExposure: !exposure!\nISO: !iso!\nLens: !lens!" "%output%"

:: Display the path of the processed file
echo Processed: "%output%"
endlocal  :: End local scope for variables

Here is a sample showing the source image on the left, the command run on the bottom; and the output on the left:

( https://adrianhensler.com/wp-content/uploads/2024/04/batch_file_example-1.png )

Future Enhancements

The session highlighted potential improvements and enhancements, such as:

Using ExifTool: For a more robust and uniform extraction of EXIF data, integrating ExifTool could handle metadata more effectively. My understanding (I have not yet tested) is that ExifTool will better handle the differences. I do want to dig more into EXIF and why it is not standardized (but not a priority now).
User Control Flags: Adding flags to control aspects like text display, color, and whether to output text on a transparent background (for use as an overlay layer) could provide greater flexibility and customization for users.

  • Dynamic Text Resizing and Placement: Further refining the script to dynamically adjust text size and placement based on image resolution and content could enhance legibility and aesthetics.
  • Interactive Mode: Incorporating an interactive mode where users can select which EXIF data to display and preview the output before final processing might enhance usability.
  • Support for Multiple Images: Extending the script to handle multiple images in a batch process could save even more time, making it suitable for professional photographers or anyone dealing with large sets of images.

Conclusion

The interactive and iterative session with ChatGPT helped to develop a practical solution that automates the embedding of EXIF data onto images—a task that can be tedious if done manually. The final batch script provides a foundational tool that can be built upon with additional features and refinements.

This process underscored the importance of adapting tools to fit specific needs and highlighted how automation can significantly streamline workflows in photography and digital image processing. Moreover, it demonstrated the potential for AI-assisted coding sessions to facilitate rapid development and problem-solving.

The potential for future enhancements also points to an ongoing journey of improvement and adaptation, making the tool ever more robust and user-friendly. This blog post not only shares a useful script but also reflects the collaborative problem-solving process that can be applied to similar challenges in other fields.

Sharing and Feedback

Feel free to adapt the script to your needs and share your modifications. I am interested in hearing how others might improve or alter it for different applications. Feedback and shared experiences can lead to even better solutions, benefiting a wider community of users.

Categories
AI ChatGPT OpenAI Photography

ChatGPT GPT: PhotoFocus

ChatGPT introduced ‘GPTs’. I made one to answer photography questions.

PhotoFocus GPT

You do have to be a ‘ChatGPT Plus’ user.

Categories
Photography

Example of simple crops and adjustments in ACDSee

I made a video and put it up on YouTube; it’s an example of a typical edit from a RAW photo. It’s nothing fancy at all – I typically only do very basic modifications to a photo. As I’ve often been interested to see how others edit their photos, I thought I would share this simple example. The steps would be similar in Lightroom or DxO or Rawtherapee etc.

Obviously, if the result is any better that the original is personal preference. I was pretty pleased with how this turned out.

Categories
Photography

ND1000 filter

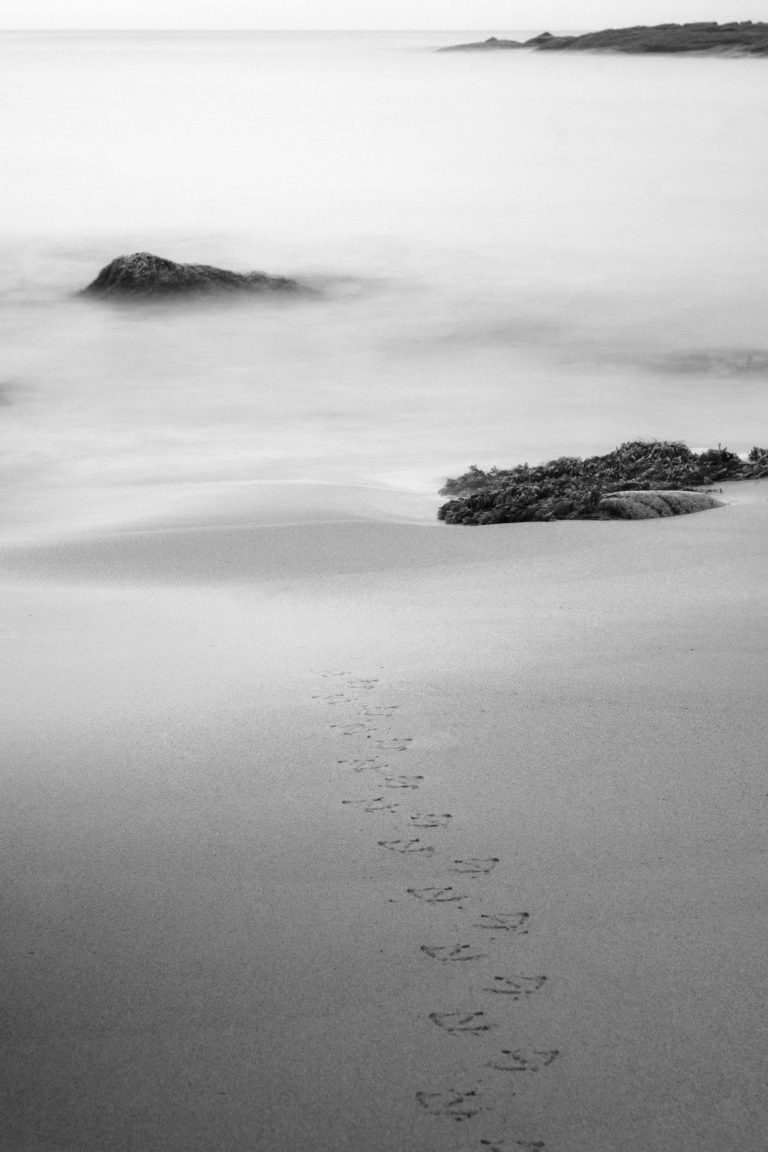
I recently bought a cheap ND1000 filter.

It casts an awful color on the long exposure, but is marketed for use into a final black and white image, so I can’t fault it for that. Original on the left, final result after some edits on the right.

This is an image that I applied more edits to than possibly any other. I am usually loathe to do much more than crop / straighten, and moderate tweaks to exposure / levels etc.

This one, I cropped really tight at the top. There wasn’t much of interest up there besides the land on the right, and I wanted to crop out the lumpy bit at the upper right land mass.

I removed lots of little dirt bits in the sand; I usually would not do so, but I really think the end result here is better. This is more of an artistic shot than I usually take.

There was a spot left that didn’t look quite right (where I removed a bit of seaweed by the second last foot) but it looks like something natural, so I left it. I’m second guessing that now that I look at it again. I don’t recall it looking so prominent before.

Categories
Darkroom Photography

Enlarger

Recently, my son purchased a 35mm camera – a Pentax K1000. He took a couple rolls worth of film; we developed it here and his shots turned out pretty well.

Seemed like the next logical step was to buy an enlarger. We seem to have missed the timing on this by a bit. It was a little difficult to find one, and cost more than I expected (Just over $200 in Canadian dollars on eBay). We missed the “this is trash throw it out” timing and caught the start (or well in the middle of?) of “hey this stuff is hard to find and only going to get harder” stage.

So we recently purchased an enlarger – a Durst F60. It accepts 35mm and 6×6 negatives, and came with both 50mm and 75mm lens/condenser sets.

Bought some trays and enough developer/stop/fix/paper/tongs etc to print a few things. See how it goes.

First round was pretty successful, for a first attempt.

First test prints on Durst F60

The upper left is the best of the bunch. I need to work on my timing mostly. Lots of reading to do still.

Categories
Photography

Welcome to adrianhensler.com

I’ve been taking pictures for a long time. I remember a relative buying me a tiny plastic toy film camera from a local convenience store at a very young age. I didn’t understand how the film worked, so I wasn’t nearly careful enough with it. My first photos were mostly ruined as the film had been overexposed. But I was instantly hooked by the idea of capturing small portions of what I was seeing in a way that might be pleasing. I did manage to hold on to one of those pictures for a long time, but I have long since lost it. It was a blurry picture of a poplar tree, and the image was also overexposed on one side.

My first decent camera purchase as an adult was a Canon Powershot A40. It was a 2mp camera, and had a tiny screen on the back. It was all I could afford at the time – and I did use it a lot. The autofocus slowly got worse and worse, and the shutter would fail to trigger. I remember the fact that it ran on regular AA batteries was a big deal for me at the time, as most rechargeable devices at the time were terrible. Here is the first picture I took with it:

First photo I took with my Canon Powershot A40
First photo I took with my Canon Powershot A40.

I got a lucky break at that point – I won an HP Photosmart R927. It was arguably a step up, with a glorious (for the time) 3 inch LCD on the back, and 8.2mp. It did in-camera panoramic stitching, and that feature was really well implemented to my recollection. This prize also included a nice portable photo printer. I seem to recall the model being HP Photosmart A627.

Sadly, my experience with that camera was not great – inconsistent results, focus hunting, and near the end an almost constant refusal to take an image when pressing the release. The printer – like all in-jets I’ve used, is now in the trash where ink-jet printers belong, and the camera is (I believe) long gone to the recycling center.

My current camera is a Canon T1i that I bought after missing one too many Christmas photos with the HP. I bought it with the 55-250mm EF-S IS lens and the kit 18-55mm lens. This has been my camera for the past 12 years. I’ve since also acquired a Sigma DG HSM 1.4 50mm lens, a Canon Speedlite 430exII and a Sigma EF-610 DG Super flash.

I’ve never really mastered the art of using flashes and try to avoid them. I do have the excellent Rocky Nook ‘Mastering Canon EOS Flash Photography by NK Guy – it is a fantastic book (I only have the first edition; the link is to a newer edition than mine).

I don’t have much other gear at all – a LensPen, a small handful of sdcards, a couple filters that I’ve carried forever and never used.

My typical style of photography is to capture what is happening without interfering. I prefer a picture that is captured as outside the moment.

My workflow is simple:

  • take a ton of photos
  • instantly delete the bad ones on camera
  • copy them to the PC when I am able, sorted YYYY_MM_DD
  • again review quickly and delete anything that didn’t get deleted in the field
  • quick rough crops and edits may be done if I think I have something good, or know I want to crop something away
  • then forget about the photos

That last step is the one I need to work on.